Father's Day Fish Cake


Bake for dad , Cake , Camping , Camping cake , Collection--novelty-cake-recipes , Dad , Dads , Fathers day , Fathers day cake , Fathers day fish cake , Fish , Fish cake , Fishie , Fishy , Giant cake , Outdoor , Outdoors , Salmon , Summer

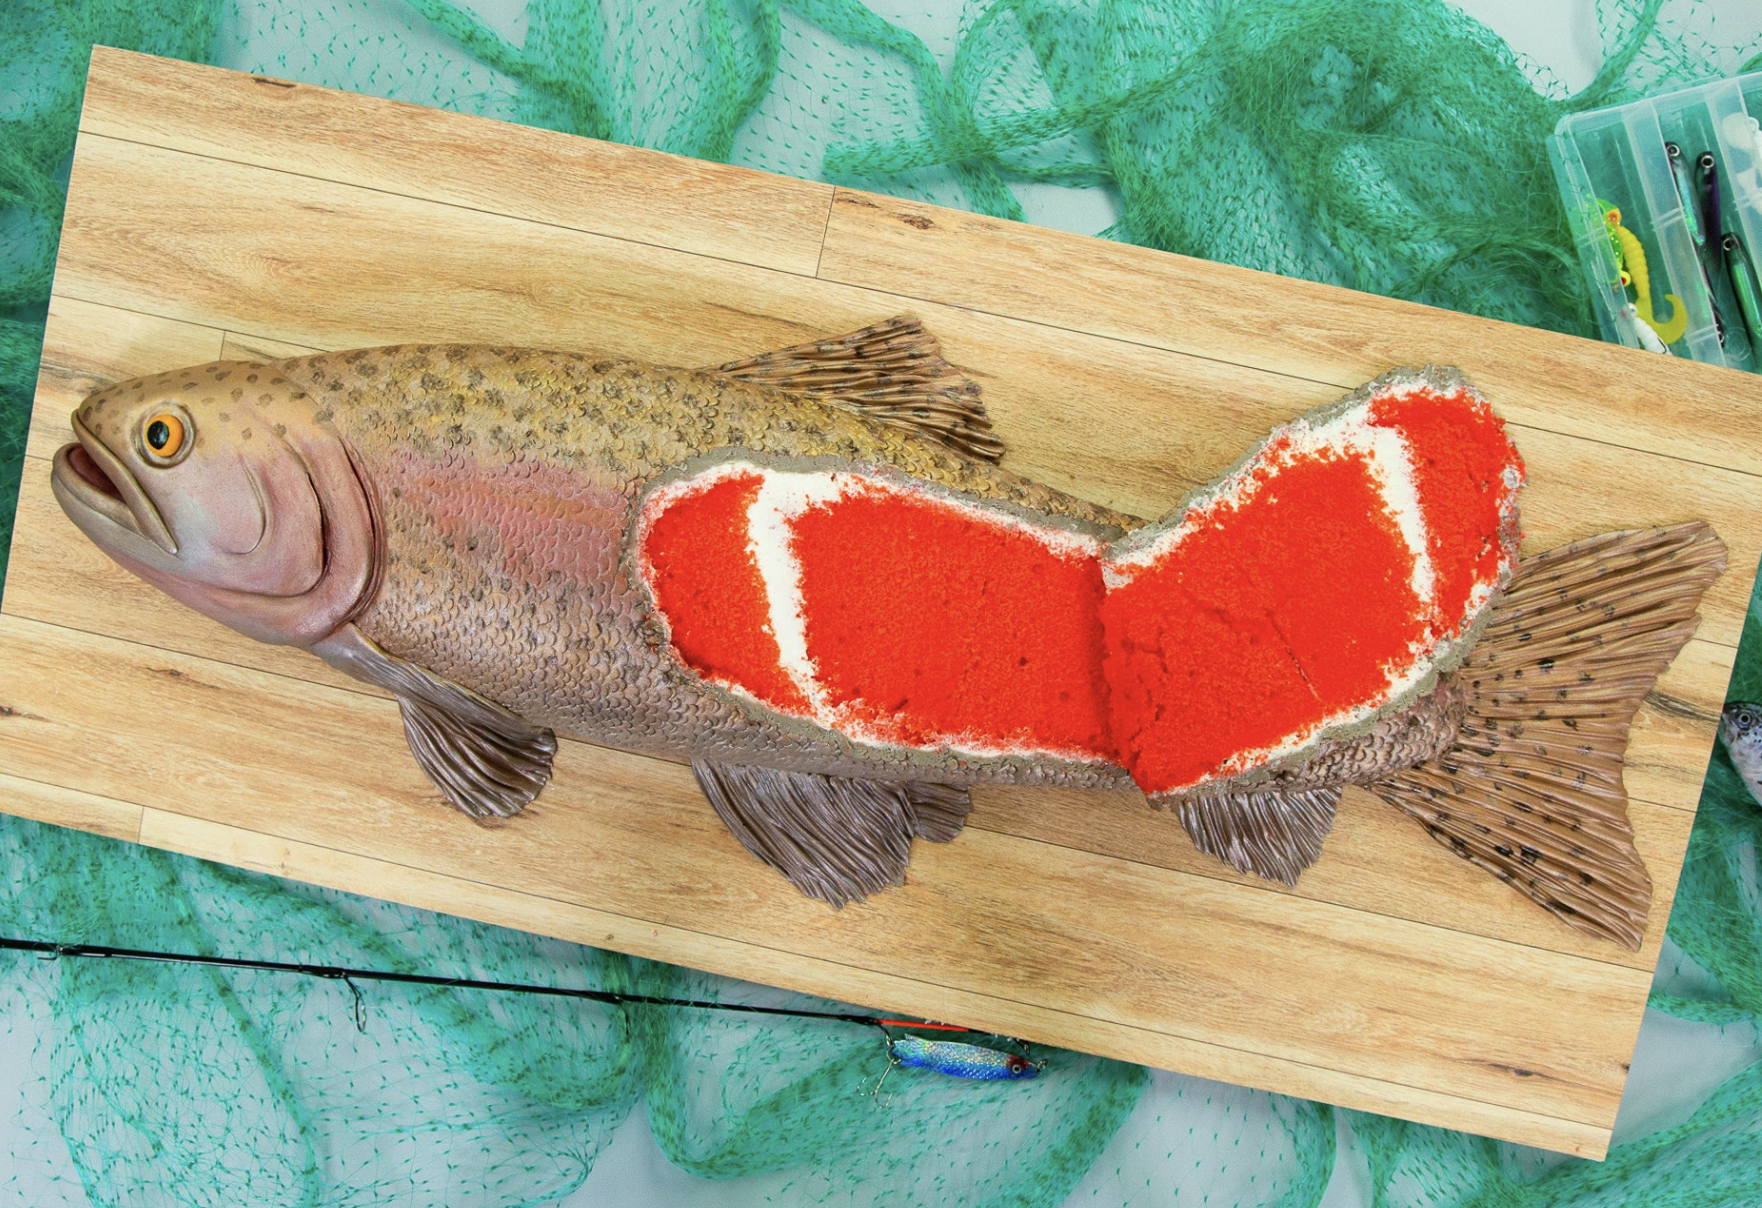
For the REELy Great Dads! Father's Day is oFISHally just around the corner and this cake is perfect for all the different types of dads out there! Whether your dad is outdoorsy, handy, sporty, intellectual or anything in between, there is one thing all dads have in common - they love to eat. Make sure you thank your dads for making any fin possible with this fun cake!
To cake my Father's Day Fish cake, I baked 10lbs of my Ultimate Vanilla Cake using pink food colouring to give it a fishy coloured inside. With Italian Meringue Buttercream between the layers, this fish cake gives a sweet bite! The cake is coated in eye-catching metallic paints and colours giving a realistic look to the fish. This cake is definitely the perfect Fathers’ Day catch


Ingredients
Cake
- 10lbs Ultimate Vanilla Cake
Icing
- Yo's Simple Syrup
- Yo’s Famous Italian Meringue Buttercream
Decorations
- 3½ lbs White fondant
- Buttercup Yellow,Brown & Black Gel Food colouring
- Pearl, rose gold, canary yellow, cappuccino, orange, pretty pink, satin white luster dusts
- Clear Food Grade Alcohol

Tools
- 12" x 18" Cake Pan
- #801 Piping Tip
- Paintbrushes
- Sculpting Tools
- Ball Tool
- Simple Syrup Squeeze Bottle
- Small Straight & Offset Spatula
- Large Straight & Offset Spatula
 Floral Dome Cake with Sasha Nary
$29.99
Floral Dome Cake with Sasha Nary
$29.99


Read It!
-
Start by colouring your 10lbs of Ultimate Vanilla Cake using pink food colouring until it closely matches the inner colour of a fish. Pour your batter into a 12x18” rectangular pan lined with parchment paper and bake for 1 hour and 50 minutes at 350 degrees Fahrenheit.
-
Begin by removing the caramelization from the bottom of the cake then using a cake board, flip it over.
-
Lay the trout template onto the cake towards the bottom edge and begin cutting the front half of the fish shape out. The front half will only take up half the width of the cake so take the other half, decarmalize the end of it, then lay it right next to the first half to extend it. Now that you have added more length to the cake, put the template back in place and continue to cut out the fish shape. Once you have your 2D shape, carve the sides to round out the top of the body and edges.
-
To add some more thickness to the fish, take the leftover cake and decarmalize it on all edges then cut it into two layers. Place the two layers on top of the fish next to each other and begin carving them to form a rounder fish body.
-
Cut the main part of the fish body in half to create 2 layers.
-
Carefully disassemble the cake and using Sir Squeeze-A-Lot and a batch of Simple Syrup, soak each piece of cake.
-
Fill your cake layers using a spatula then put the fish pieces back together.
-
Crumb coat the cake with IMBC then let it cool in the fridge until it is firm.
-
Cut out the fish’s mouth using the template once again as a guide. Once it’s cut, make sure to ice some buttercream on the inside of the mouth as well.
-
Measure the length and width of the fish then roll out some “greige” (white with some black and brown) fondant. Trim the excess and smooth it out. Getting the fondant into the mouth is a little difficult so if it rips, just roll out a little extra and pat it in.
-
Take the template and lightly mark where the face of the fish ends. Using a piping tip, make small indents along the entire body to replicate little scales avoiding the face.
-
To raise the face of the fish, roll out some more greige fondant then wet the area on the cake and place the fondant over it. Make sure you trim the excess and smooth it down as well.
-
Following the template again and using various sculpting tools, make indents around the face to create gill-like lines.
-
Mark off where the eye should go using the template then use the ball tool again to create indents for where the eye should be.
-
Take some more greige fondant and roll it out into thin little cords. With some clear piping gel, glue the thin tubes onto the edges of the fish’s mouth and shape them until you are satisfied.
-
Cut out the fins and tail from your fish template and roll out some more greige fondant for one fin at a time. When you roll out the fondant, roll it so that the end that meets the body of the fish is thinner than the other. Place the template on the fondant and cut the shapes out with a small paring knife. Using sculpting tools, add texture to the fins all in one direction.
-
To add the fins to the fish, use some clear piping gel while double checking the template to ensure the pieces are in the right place. Because the fish isn’t flat and some pieces may need a lift, use some more greige fondant to create little ramps to prop the pieces up. Make sure these ramps are smaller than the fins so that they are hidden.
-
The fish tail is made in the same way as the fins but with more fondant. Keep in mind that the top needs to curve to fit around the fish so again with the template, cut that end out accordingly. Texture the tail with the sculpting tools then place it at the end of the fish. To make the tail fit better, use your fingers to mold it to the body which ultimately acts as the seam hiding.
-
For the eyeball, use a little bit of gumpaste and quickly dye it yellow. Don’t glue it to the cake yet but ensure that it fits in the indent made for the eye earlier.
-
Starting with a base coat of silver mixed with pearl luster dust and food grade alcohol, paint the entire cake – even the inside of the mouth. For the top of the fish and the fins, mix some canary yellow, cappuccino, and orange luster dust with food grade alcohol to create a goldish brown colour then paint it on. The next layer will be a mixture of pretty pink, rose gold, orange, and a bit of yellow luster dust as well as food grade alcohol. Paint this mixture along the middle line of the fish’s body as well as on the face. Lastly, paint on some satin white onto the belly of the fish for some highlight. Keep painting the fish and layering on colours until you are satisfied – this is how you can make your fish unique! Make sure you are using enough food grade alcohol so that the mixture is paintable but not runny. The last texture to add to the fish is the speckles. Use some gel colour, food grade alcohol, and a round brush then speckle the top of the cake.
TIP: to protect your cake board, slide small pieces of parchment paper under the cake.
-
Paint the eyeball with some canary yellow and clear food grade alcohol then glue it to the socket with some clear piping gel. With some black gel colour, paint the pupil onto the eye. Using
-
With a small paring knife, cut open the gills to add a more realistic touch to the fish. Touch up the new cuts with some more paint.
Congratulations you did it!
